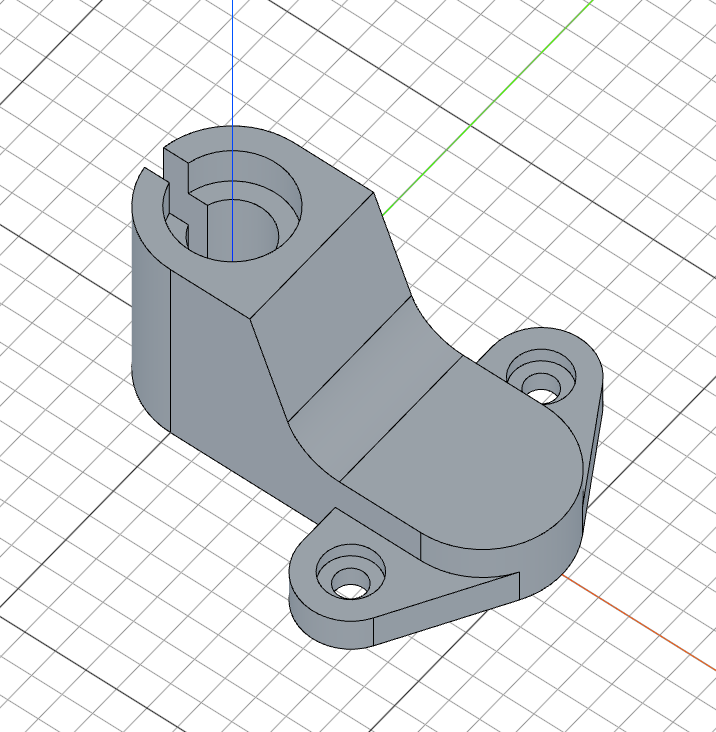
Building an L-Stub
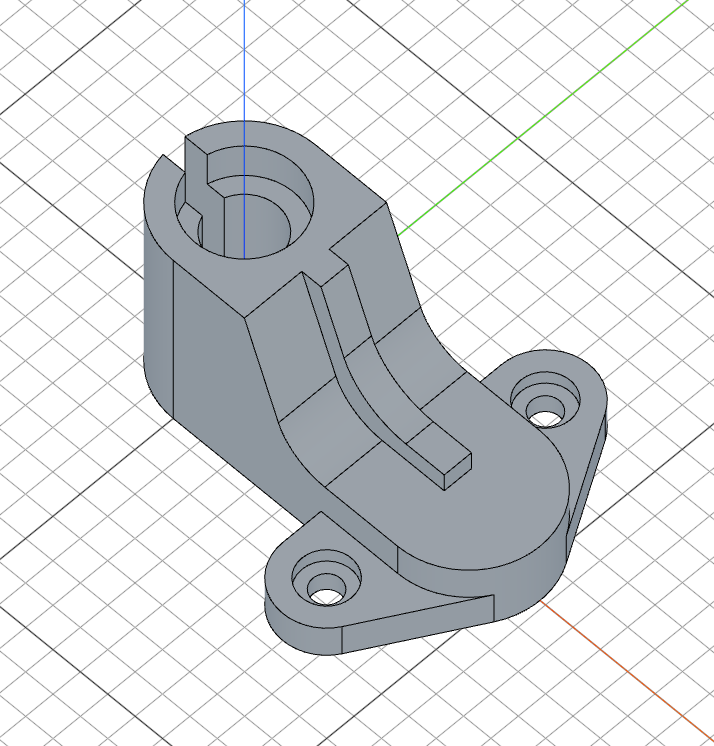
In this tutorial, you'll build an L-shaped stub bracket from scratch, based on the original design by Too Tall Toby. It covers compound profiles built with subtract/fuse, thin symmetric cuts driven by guide geometry, tangent geometry with selective mirror().exclude(), and projecting an existing internal face into a sketch with intersect.
Create a new file called l-stub.fluid.js in your project.
Setup
Start with the imports.
import { enclosing } from "fluidcad/constraints";
import { aLine, back, circle, cut, extrude, fillet, fuse, hLine, hMove,
    intersect, line, mirror, move, rect, sketch, slot, subtract, tLine,
    vLine, vMove } from "fluidcad/core";
fluidcad/core— the modeling operationsfluidcad/constraints— theenclosingconstraint, used later to draw tangent lines on the inside of two circles
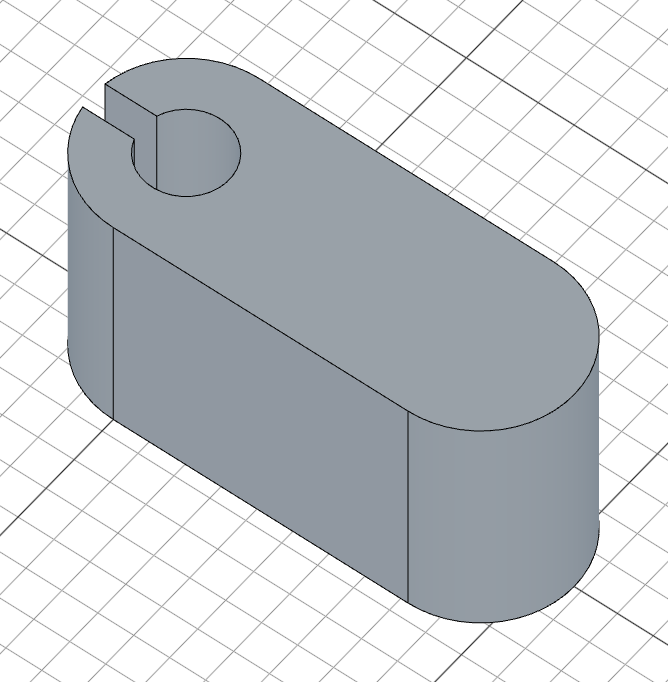
Step 1: The base body
The base profile is a slot with a keyed hole subtracted from one end.
Build the compound profile
sketch("top", () => {
    const s = slot(82, 26);
    const f = fuse(circle(24).name("Hole"),
        rect(-30, 8).centered('vertical').name("Slot Cut"));
}).name("Base Sketch");
slot(82, 26) draws a slot 82 units long with 26-unit radius end caps — that's the outer footprint of the base. We capture it as s because we'll subtract from it.
The keyed hole is the union of two shapes: circle(24) is the round bore, and rect(-30, 8).centered('vertical') is a narrow rectangle that extends 30 units to the left, centered vertically about the cursor — together they form a circle with a slot cut into one side. fuse(...) joins them into a single combined shape f. Naming each piece ("Hole", "Slot Cut") keeps the model tree readable.

Subtract and extrude
sketch("top", () => {
    const s = slot(82, 26);
    const f = fuse(circle(24).name("Hole"),
        rect(-30, 8).centered('vertical').name("Slot Cut"));
    subtract(s, f)
}).name("Base Sketch");

const base = extrude(70).name("Base")
subtract(s, f) removes the keyed hole from the slot, leaving the final base profile.

extrude(70) pushes the profile up 70 units. We store it as base so we can reference its top face for the next sketch.
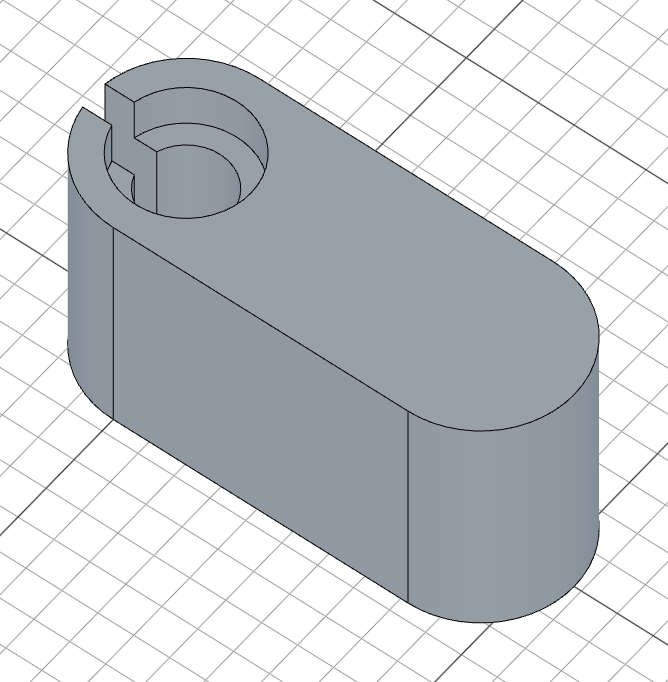
Step 2: Counterbore on the keyed hole
Sketch the counterbore circle
sketch(base.endFaces(), () => {
    circle([0, 0], 36)
}).name("Counterbore Sketch");
base.endFaces() gives us the top face of the base. circle([0, 0], 36) places a 36-unit radius circle at the face origin — concentric with the keyed hole below.

Cut the counterbore
cut(13).name("Counterbore")
cut(13) removes 13 units of material downward, creating a shallow recess around the keyed hole.
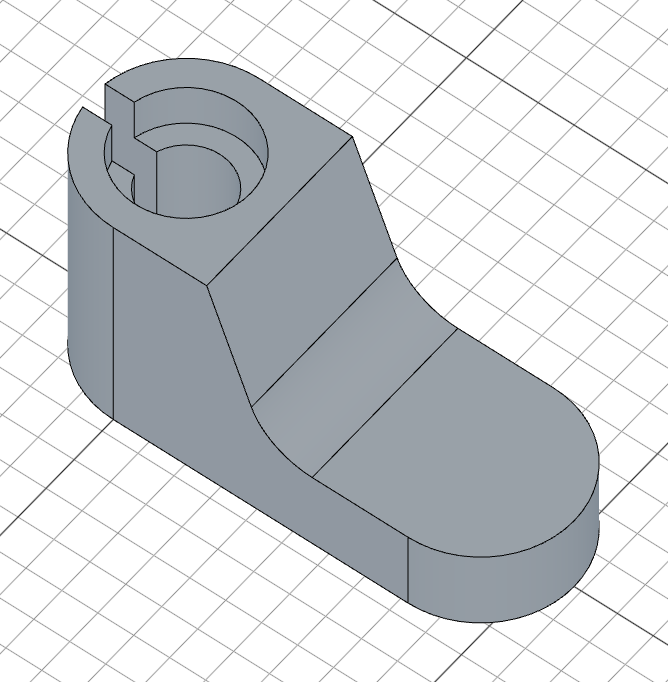
Step 3: The angled split
The body has an angled slot cutting halfway through it. We sketch an open path from the front, then use a thin symmetric cut.
Sketch the angled path
sketch("front", () => {
    vMove(24)
    const l = hLine(200).guide().centered()
    move([0, 70]);
    hMove(26);
    aLine(-90 + 20, l)
    hLine(100)
    fillet(18)
}).name("Split Sketch")
vMove(24) moves the cursor up 24 units, then hLine(200).guide().centered() draws a 200-unit horizontal construction line centered on that cursor — this is the floor of the split, used as a target for the angled line below. .guide() makes it a reference only; it won't be cut.
move([0, 70]) then hMove(26) jump to the start of the cut path: 26 units to the right of center, 70 units above the base. aLine(-90 + 20, l) draws an angled line at -70° (i.e. -90° + 20° from horizontal) that stops when it hits the guide line l. hLine(100) extends 100 units to the right along the floor, and fillet(18) rounds the corner between them with an 18-unit radius.

Thin symmetric cut
const c = cut().symmetric().thin(50).name("Split")
cut() with no depth removes material all the way through. .thin(50) gives the open path a 50-unit wall thickness — turning the path into a slot. .symmetric() mirrors the cut equally on both sides of the front plane, so the slot stays centered on the part. We capture the operation as c because we'll project its internal faces into the rib sketch later.
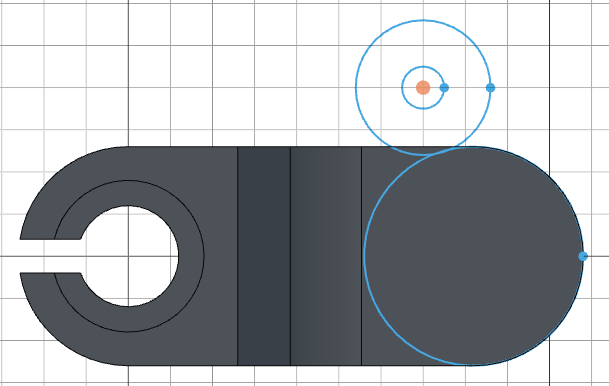
Step 4: The flange
The flange is a tab on top of the body that hosts the two mounting holes. Its profile is two circles joined by tangent lines, mirrored across the X axis — but with the big central circle excluded from the mirror so it isn't doubled up.
Sketch the three circles
sketch("top", () => {
    hMove(82)
    const c1 = circle(26 * 2);
    move([70, 40])
    const c2 = circle(16 * 2)
    circle(10)
}).name("Flange Sketch");
hMove(82) slides the cursor 82 units to the right — over the rounded end of the slot. circle(26 * 2) places the big circle of radius 52 there as c1. move([70, 40]) then jumps to the boss position where circle(16 * 2) draws the boss outline as c2 (radius 32) and circle(10) adds the bolt hole inside it.
Tangent line between the two outer circles
tLine(enclosing(c1), enclosing(c2))
tLine(enclosing(c1), enclosing(c2)) draws a line tangent to both c1 and c2. The enclosing constraint asks for the tangent on the side that encloses both circles (the inside) — this is the side that will form the smooth flank of the flange.
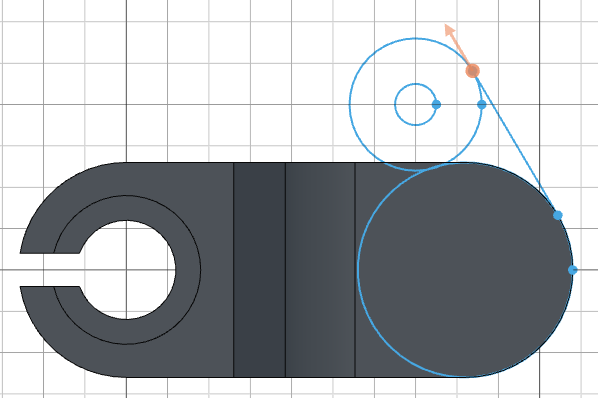
Tangent stub from the boss
    move([70 - 16, 0])
    tLine(enclosing(c2))
move([70 - 16, 0]) puts the cursor on the inner edge of the boss circle (its center is at x=70 with radius 16). tLine(enclosing(c2)) draws a tangent line from that point back to c2, again on the enclosing side. This little line closes the flange profile against the bore wall.
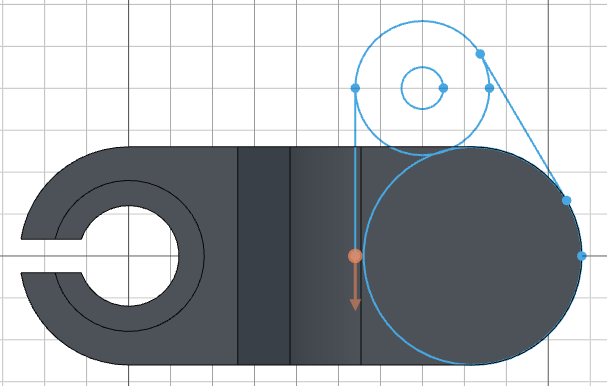
Mirror, excluding the big circle
mirror("x").exclude(c1)
mirror("x") mirrors every shape in the sketch across the X axis. .exclude(c1) tells the mirror to leave the big central circle alone — without this, c1 would be duplicated on top of itself. The boss, bolt hole, and tangent lines all get mirrored to form the symmetric flange profile.

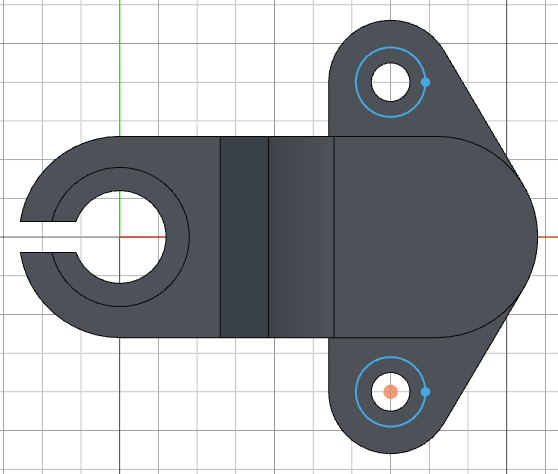
Extrude the flange
const flange = extrude(12).name("Flange")
extrude(12) pushes the profile up 12 units to form the flange. We hold onto it as flange to reference its top face for the counterbores.

Step 5: Flange counterbores
Sketch the counterbore circles
sketch(flange.endFaces(), () => {
    move([70, 40])
    circle(18)
    mirror("x")
}).name("Flange Counterbore Sketch");
On the top face of the flange, move([70, 40]) jumps to the boss center, circle(18) places an 18-unit counterbore circle, and mirror("x") produces a matching one on the other boss.
Cut the counterbores
cut(5).name("Counterbore");
cut(5) removes 5 units of material — a shallow recess around each bolt hole.
Step 6: The support rib
The rib runs from the bottom of the angled split out to the side of the slot. We build its profile on the front plane, using the split's own internal face as the rib's leading edge.
Project the split's internal face
sketch("front", () => {
    const thickness = 7;
    const i = intersect(c.internalFaces())
}).name("Rib Sketch");
intersect(c.internalFaces()) projects the internal faces of the split cut c (the two flat walls of the angled slot) onto the front plane. We store the result as i — the projected edges land exactly on the rib's leading edge, so we can snap the rib's last line to one of i's endpoints later. thickness = 7 is the rib wall thickness, used twice below.

Guide lines for the rib end
    move([82 + 26 - 30, 0])
    vMove(24 + thickness)
    const hl = hLine(100).guide().centered();
    back()
    const vl = vLine(30).centered();
move([82 + 26 - 30, 0]) and vMove(24 + thickness) walk the cursor to where the rib's far end sits — 30 units back from the slot's far edge, and thickness above the split floor. hLine(100).guide().centered() lays a horizontal guide there for the angled rib line to terminate against. back() rolls the cursor back one step so we're not at the end of the guide line, then vLine(30).centered() draws a short vertical line vl — the actual back edge of the rib.

Angled top and connector
    move([0, 70]);
    hMove(26)
    pMove(7, -90+20)
    aLine(-90, hl)
    hLine(vl)
move([0, 70]) and hMove(26) position the cursor at the top of the rib, against the angled split wall. pMove(7, -90+20) then steps thickness perpendicular to the split wall (the wall runs at -90+20°, so this offset clears it by exactly the rib thickness). aLine(-90, hl) draws a vertical line down to the horizontal guide hl — it stops automatically when it hits hl. hLine(vl) then runs across to the back edge vl, again stopping where it meets the line.

Round the corner and close the profile
    fillet(24)
    move(i.end());
    hLine(10)
fillet(24) rounds the corner where the angled line meets the horizontal connector with a 24-unit radius. move(i.end()) jumps the cursor to the end of the projected internal-face geometry, and hLine(10) draws the closing horizontal edge back into the rib profile — sealing it against the existing split wall.

Extrude the rib
extrude(10).symmetric().name("Rib")
extrude(10).symmetric() pushes the rib profile 10 units, mirrored across the front plane, so the rib straddles the body symmetrically.
Full code
// @screenshot waitForInput
import { enclosing } from "fluidcad/constraints";
import { aLine, back, circle, cut, extrude, fillet, fuse, hLine, hMove, intersect, mirror, move, pMove, rect, sketch, slot, subtract, tLine, vLine, vMove } from "fluidcad/core";

sketch("top", () => {
    const s = slot(82, 26);
    const f = fuse(circle(24).name("Hole"),
        rect(-30, 8).centered('vertical').name("Slot Cut"));
    subtract(s, f)
}).name("Base Sketch");

const base = extrude(70).name("Base")

sketch(base.endFaces(), () => {
    circle([0, 0], 36)
}).name("Counterbore Sketch");

cut(13).name("Counterbore")

sketch("front", () => {
    vMove(24)
    const l = hLine(200).guide().centered()
    move([0, 70]);
    hMove(26);
    aLine(-90 + 20, l)
    hLine(100)
    fillet(18)
}).name("Split Sketch")

const c = cut().symmetric().thin(50).name("Split")

sketch("top", () => {
    hMove(82)
    const c1 = circle(26 * 2);
    move([70, 40])
    const c2 = circle(16 * 2)
    circle(10)

    tLine(enclosing(c1), enclosing(c2))

    move([70 - 16, 0])
    tLine(enclosing(c2))

    mirror("x").exclude(c1)
}).name("Flange Sketch");

const flange = extrude(12).name("Flange")

sketch(flange.endFaces(), () => {
    move([70, 40])
    circle(18)
    mirror("x")
}).name("Flange Counterbore Sketch");

cut(5).name("Counterbore");

sketch("front", () => {
    const thickness = 7;
    const i = intersect(c.internalFaces())

    move([82 + 26 - 30, 0])
    vMove(24 + thickness)
    const hl = hLine(100).guide().centered();
    back()
    const vl = vLine(30).centered();

    move([0, 70]);
    hMove(26)
    pMove(7, -90+20)
    aLine(-90, hl)
    hLine(vl)

    fillet(24)
    move(i.end());
    hLine(10)
}).name("Rib Sketch");

extrude(10).symmetric().name("Rib")
What you practiced
slot()— drawing a slot footprint with a single callfuse()+subtract()— building a compound profile by joining shapes and subtracting them inside a sketchhLine().guide().centered()— horizontal construction lines that act as targets for angled or stopping geometryaLine(angle, target)— angled lines that terminate automatically against a target linecut().thin().symmetric()— turning an open path into a symmetric thin slottLine(enclosing(...), enclosing(...))— tangent lines on the enclosing side of two circlesmirror("x").exclude(c1)— mirroring sketch geometry while leaving a specific shape out of the duplicateintersect(c.internalFaces())— projecting the internal faces of a cut into the active sketch as construction edgesback()— undoing the last cursor move so the next line starts from the previous positionpMove(distance, angle)— stepping the cursor perpendicular-style at a specific angle (used here to offset by the rib thickness along the angled split wall)move(point)— repositioning the cursor to a specific endpoint (likei.end()) before continuing the path