Building a Hinge Bracket
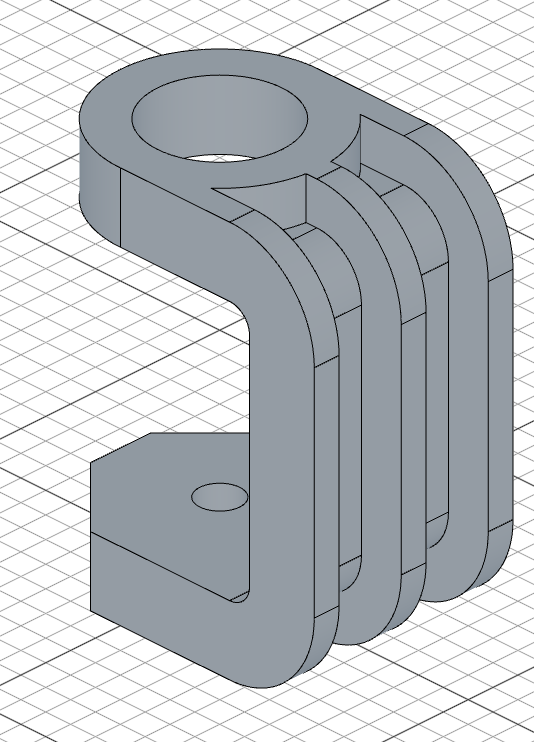
In this tutorial, you'll build a hinge bracket from scratch, based on the original design by Too Tall Toby. It covers reusable path sketches, thin symmetric extrusions, projecting edges into a sketch, chamfering and shelling selected features, face-based sketching, filter-based trimming, and building ribs from a projected spine.
Create a new file called hinge-bracket.fluid.js in your project.
Setup
Start with the imports. This model uses core operations together with edge and face filters.
import { arc, chamfer, circle, cut, extrude, fillet, hLine, hMove, move,
    plane, project, remove, select, shell, sketch, split, trim, vLine } from "fluidcad/core";
import { edge, face } from "fluidcad/filters";
fluidcad/core— all the modeling operations (sketch, extrude, cut, shell, split, trim, etc.)fluidcad/filters—edgeandfaceselection filters for chamfer, shell, trimming, and face-based sketching
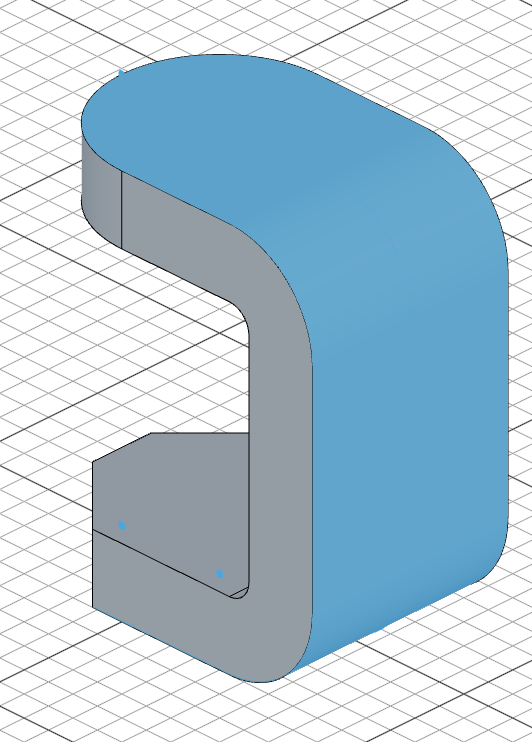
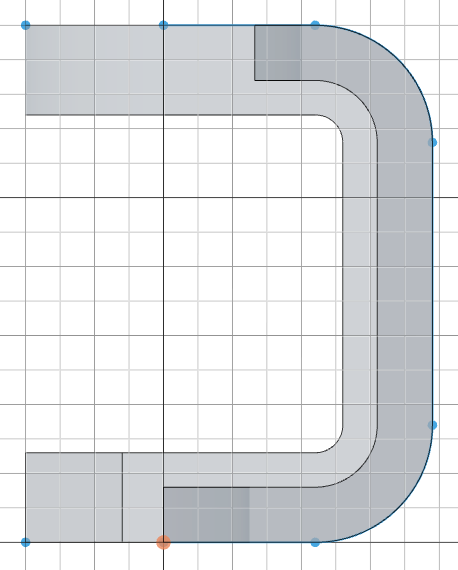
Step 1: The spine and base body
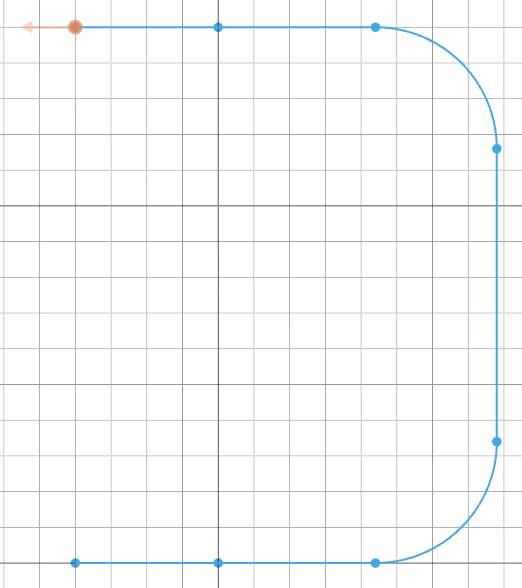
Draw the spine
The spine is an open path that traces one side of the bracket's cross-section. Later steps will reuse it as the extrude profile and again as a projection source for the ribs, so we mark it .reusable().
const spine = sketch("front", () => {
    hMove(-40)
    hLine(40)
    hLine(78);
    vLine(150);
    hLine(-78)
    hLine(-40)
    fillet(34)
}).reusable();
hMove(-40) shifts the cursor 40 units to the left, then the two hLine calls trace 40 + 78 = 118 units to the right along the bottom. vLine(150) runs up the outside, and the two hLine(-78) / hLine(-40) calls trace back across the top. fillet(34) rounds the two top corners with a 34-unit radius.
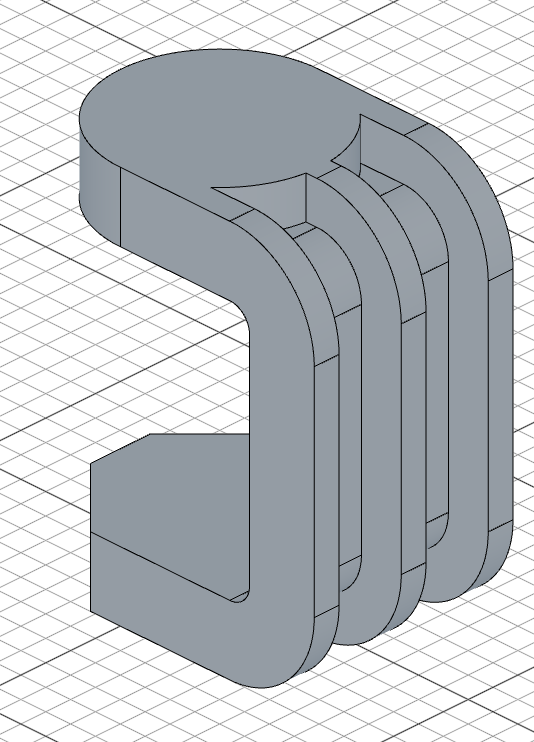
Extrude the thin wall
let base = extrude(80).thin(26).symmetric();
extrude(80) pushes the open path 80 units along the normal. .thin(26) gives the path a 26-unit wall thickness — turning the open spine into a C-shaped shell. .symmetric() splits the 80-unit depth evenly on both sides of the sketch plane, so the bracket is centered on the front plane.
Step 2: The top cutout
Sketch the arc
The top of the bracket gets a rounded pocket. We sketch a centered arc with a guide line to define the cut boundary.
const topPlane = plane(base.sideFaces(4))

sketch(topPlane, () => {
    move([0, 0])
    arc(40).centered()
    move([-2, 0])
    vLine(100).centered().guide()
});
plane(base.sideFaces(4)) builds a sketch plane on the top face of the base. Inside the sketch, move([-2, 0]) offsets the cursor slightly left, then vLine(100).centered().guide() draws a tall vertical guide line — this defines where the thin cut boundary will be. move([0, 0]) resets the cursor to the origin, and arc(40).centered() draws a semicircular arc of radius 40.

Cut through
cut(26).thin(50);
cut(26) removes 26 units of material straight down from the sketch. .thin(50) gives the open arc a 50-unit wall thickness before cutting — deliberately oversized so the offset fully covers all edges of the arc. Any excess beyond the actual body is harmless.
Step 3: Chamfer and shell
Chamfer the vertical edges
select(edge().verticalTo("top").line(26))
chamfer(28);
edge().verticalTo("top").line(26) finds the straight edges that are vertical relative to the top plane and exactly 26 units long — the four short vertical corners left by the top cutout. chamfer(28) breaks them with a 28-unit chamfer, blending the cutout into the side walls.
Select the faces to remove
select(face().cylinderCurve(34 * 2).withTangents());
face().cylinderCurve(34 * 2) matches the cylindrical face whose curvature diameter is 34 * 2 = 68 — that's the rounded end face of the cutout (the fillet radius was 34). .withTangents() extends the selection to every face tangent-connected to it, so the straight side faces of the cutout are included too.
Shell the body
shell(-10)
shell(-10) hollows the body with a 10-unit wall, removing the selected faces so the top cutout becomes an open pocket.
Step 4: Top boss
sketch(topPlane, () => {
    circle([0, 0], 80)
});

extrude(-20)
Back on topPlane, circle([0, 0], 80) places an 80-unit-radius circle on the origin. extrude(-20) pushes it 20 units downward (into the body), building a cylindrical boss that will host the hinge pin.

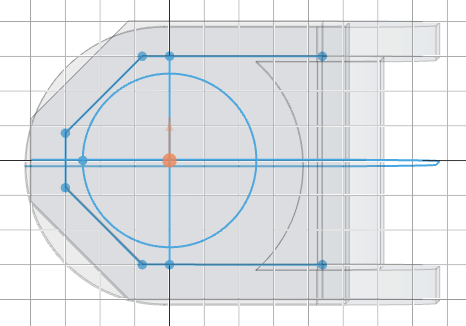
Step 5: Hinge tab on the base
Sketch the tab profile
The tab sits on the XY plane, 16 units up from the origin. We reuse the face selection twice — once as the sketch plane, once as a projection source — so we mark it .reusable() and remove it manually at the end.
const faceSelection = select(face().onPlane("xy", 16)).reusable()
sketch(faceSelection, () => {
    move([0, 0])
    project(faceSelection)
    vLine(60).centered()
    split()
    trim(edge().above("yz"))
    circle([0, 0], 50)
});

remove(faceSelection);
Sketching on a face starts at the face center, so move([0, 0]) resets the cursor to the sketch origin. project(faceSelection) pulls the face outline into the sketch. vLine(60).centered() draws a vertical construction line that splits the profile in half. split() splits all edges at their intersection points, then trim(edge().above("yz")) removes every edge that lies above (to the right of) the YZ plane — keeping only the left half that extends out past the base. Finally, circle([0, 0], 50) adds the circle that forms the tab's rounded end. remove(faceSelection) clears the reusable selection so it doesn't leak into later operations.
Extrude the tab
extrude(16)
extrude(16) pushes the trimmed profile 16 units up to form the hinge tab.
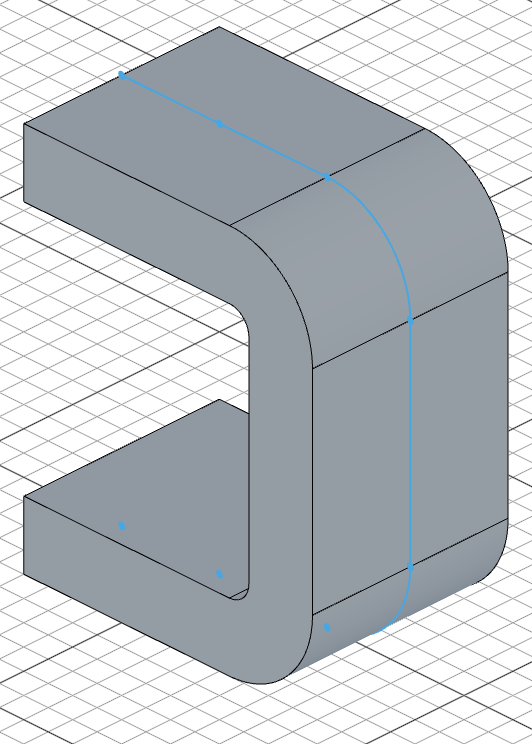
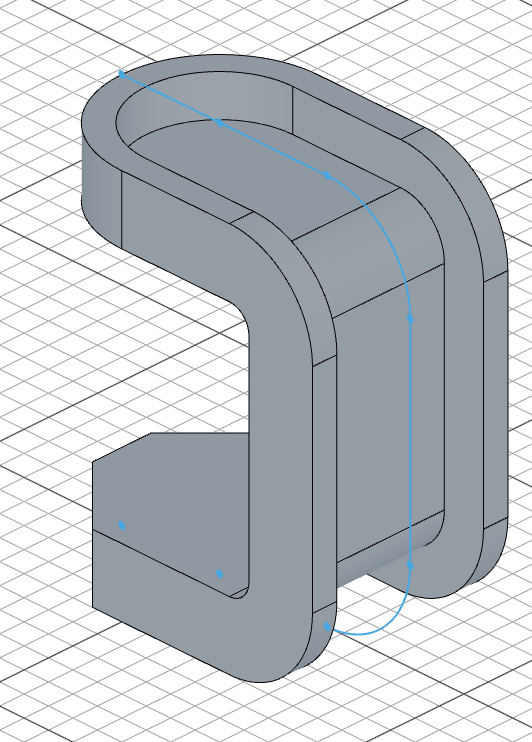
Step 6: Support ribs
Sketch the rib profile from the spine
const ribSketch = sketch("front", () => {
    project(spine);
    trim(edge().below("yz", { partial: true }))
});
On the front plane, project(spine) pulls the original spine path back into a new sketch. trim(edge().below("yz", { partial: true })) removes every edge that is at least partially below the YZ plane — this strips away the bottom horizontal segments, leaving only the corner-and-fillet region that becomes the rib profile. The partial: true option means an edge is removed if even one of its vertices is below the plane, which cleanly catches edges that cross the boundary.
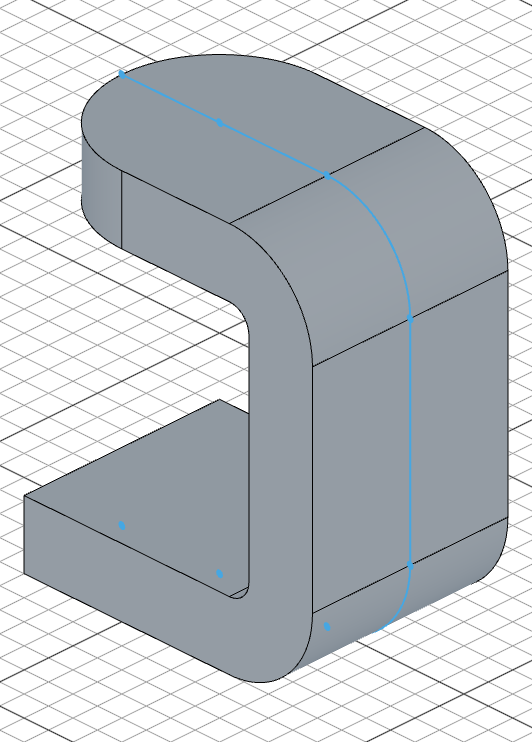
Extrude the ribs
extrude(10, ribSketch).thin(16).symmetric()

remove(spine)
extrude(10, ribSketch) extrudes the trimmed rib profile 10 units. .thin(16) gives it a 16-unit wall thickness, and .symmetric() mirrors it across the sketch plane so the rib is centered on the bracket. Once the ribs are built, remove(spine) clears the reusable spine sketch — we won't need it again.
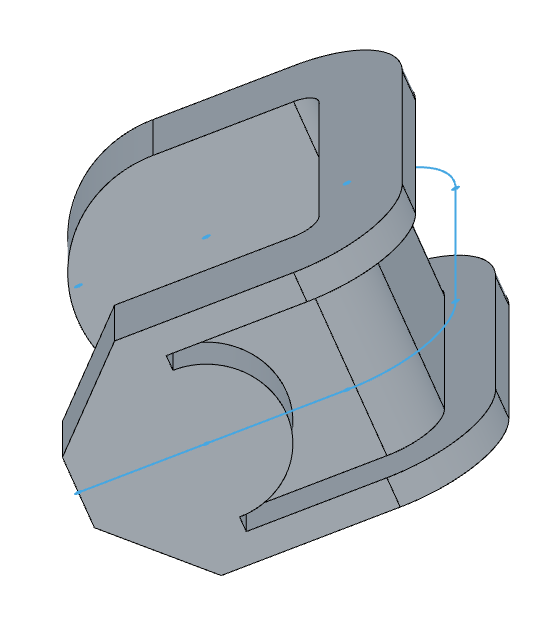
Step 7: Pin holes
Top pin hole
sketch("top", () => circle(16))
cut(-26)
sketch("top", () => circle(16)) drops a circle of radius 16 on the top plane at the origin. cut(-26) removes 26 units of material downward, boring the hinge-pin hole through the top boss.
Bore through the boss
sketch(topPlane, () => {
    circle([0, 0], 50);
});

cut(26);
A larger circle of radius 50, sketched back on topPlane, opens up the inside of the boss. cut(26) removes 26 units of material to finish the bore.
Full code
// @screenshot waitForInput
import { arc, chamfer, circle, cut, extrude, fillet, hLine, hMove, move, plane, project, remove, select, shell, sketch, split, trim, vLine } from "fluidcad/core";
import { edge, face } from "fluidcad/filters";

const spine = sketch("front", () => {
    hMove(-40)
    hLine(40)
    hLine(78);
    vLine(150);
    hLine(-78)
    hLine(-40)
    fillet(34)
}).reusable();

let base = extrude(80).thin(26).symmetric();

const topPlane = plane(base.sideFaces(4))

sketch(topPlane, () => {
    move([0, 0])
    arc(40).centered()
    move([-2, 0])
    vLine(100).centered().guide()
});

cut(26).thin(50);

select(edge().verticalTo("top").line(26))
chamfer(28);

select(face().cylinderCurve(34 * 2).withTangents());
shell(-10)

sketch(topPlane, () => {
    circle([0, 0], 80)
});

extrude(-20)

const faceSelection = select(face().onPlane("xy", 16)).reusable()
sketch(faceSelection, () => {
    move([0, 0])
    project(faceSelection)
    vLine(60).centered()
    split()
    trim(edge().above("yz"))
    circle([0, 0], 50)
});

remove(faceSelection);

extrude(16)

const ribSketch = sketch("front", () => {
    project(spine);
    trim(edge().below("yz", { partial: true }))
});

extrude(10, ribSketch).thin(16).symmetric()

remove(spine)

sketch("top", () => circle(16))
cut(-26)

sketch(topPlane, () => {
    circle([0, 0], 50);
});

cut(26);
What you practiced
sketch().reusable()— keeping a sketch alive so later operations can reuse it as a profile or projection sourceextrude().thin().symmetric()— turning an open path into a symmetric thin-walled bodycut().thin()— limiting a cut to a specific wall thicknessvLine().guide()— drawing a construction line that guides cut boundaries without appearing in the final geometryproject()inside a sketch — pulling existing edges or a reusable sketch into the active sketch planeplane(face)— deriving a sketch plane directly from a model faceedge().verticalTo().line()�� selecting straight edges by orientation and lengthface().cylinderCurve().withTangents()— selecting a cylindrical face by its curvature and expanding to tangent-connected faceschamfer()/shell()— breaking sharp edges and hollowing the body with face removalface().onPlane()+.reusable()+remove()— using a face selection twice, then releasing itsplit()+trim(edge().above())— splitting edges at intersections, then removing edges by position with a filter instead of fragile point-based trimmingtrim(edge().below("yz", { partial: true }))— removing projected edges by spatial position, usingpartialto catch edges that cross the boundaryextrude(depth, sketch)— extruding a named sketch (the ribs) rather than the most recent one