Building a Grooved Box
In this tutorial, you'll build a grooved storage box based on the original design by Too Tall Toby. It covers rounded rectangles, shelling, filleting internal edges, face intersection sketches, thin extrusions, and linear repeat patterns.
Create a new file called grooved-box.fluid.js in your project.
Setup
Start with the imports for every operation we'll use.
import { sketch, extrude, select, fillet, rect, shell, intersect, repeat } from 'fluidcad/core';
import { face } from 'fluidcad/filters';
shell— hollows out a solid bodyintersect— creates a sketch profile from the intersection of faces with a planerepeat— duplicates geometry in a linear patternface— filter for selecting faces by geometric criteria
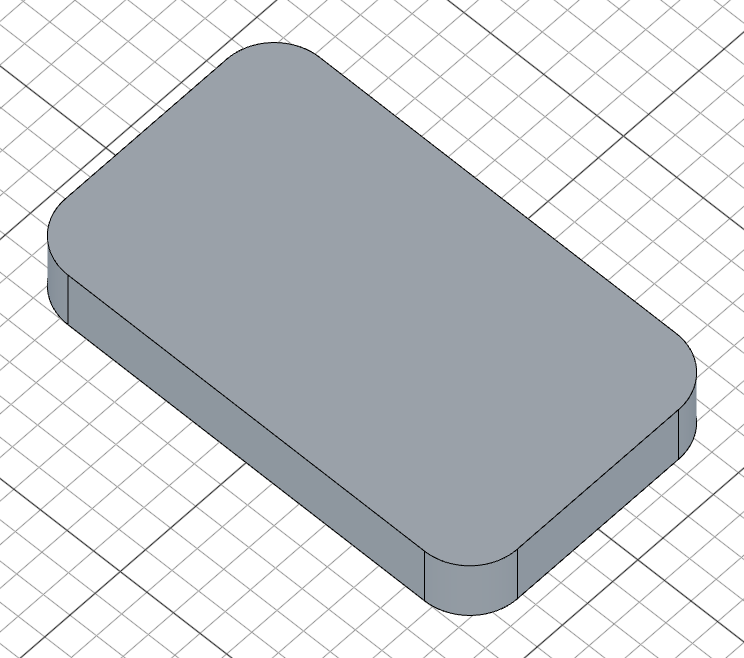
Step 1: Base shape
The box starts as a rounded rectangle extruded into a solid block.
sketch("xy", () => {
    rect(170, 100).radius(18).centered();
});

const e = extrude(23.6);
rect(170, 100) draws a 170 x 100 rectangle. .radius(18) rounds all four corners with an 18-unit fillet radius, and .centered() centers it on the origin. extrude(23.6) pushes the shape up into a solid block. We store the result in e so we can reference its faces later.
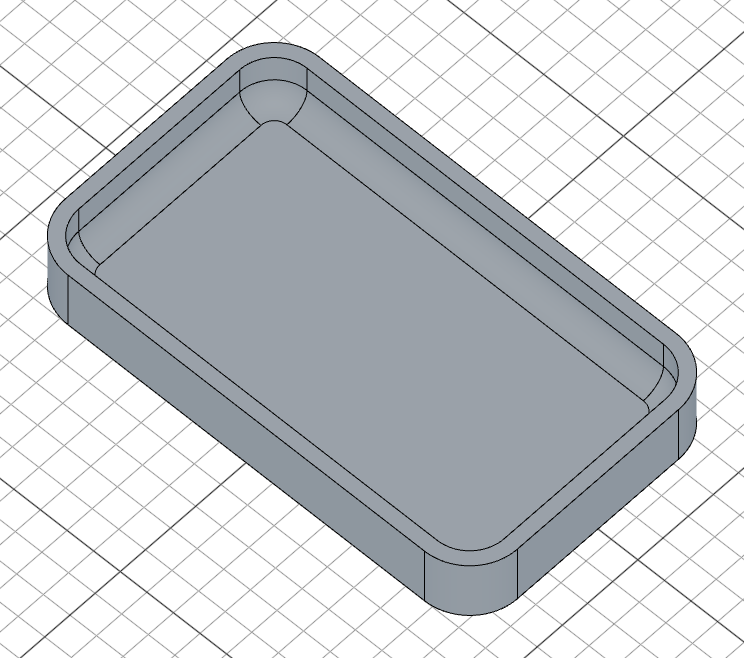
Step 2: Shell and fillet
Now we hollow out the box and smooth the internal edges.
Shell
const s = shell(-5, e.endFaces())
shell(-5) hollows the solid with 5-unit thick walls. The second argument e.endFaces() specifies which face to remove — the top face of the extrusion. This creates an open-top container.
Fillet internal edges
fillet(8, s.internalEdges())
s.internalEdges() selects all edges on the inside of the shell. fillet(8) rounds them with an 8-unit radius, giving the interior smooth transitions between the walls and the bottom.
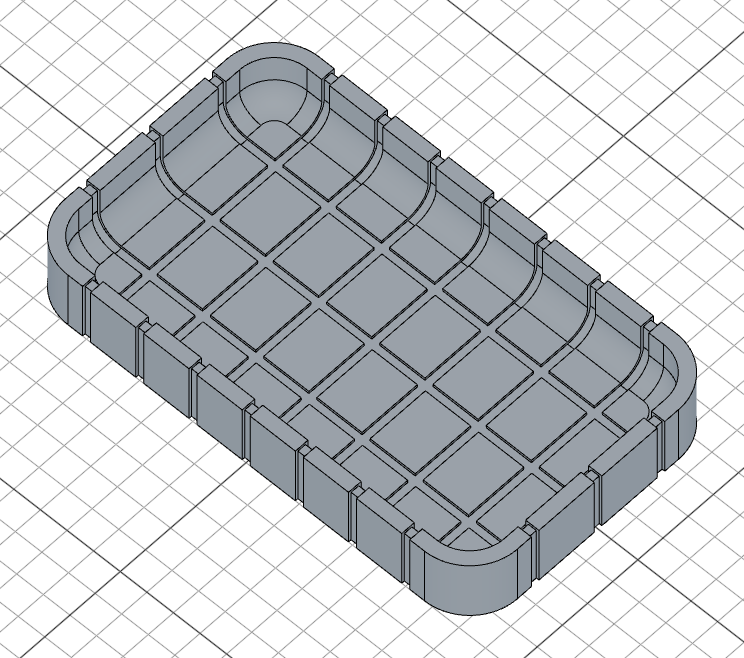
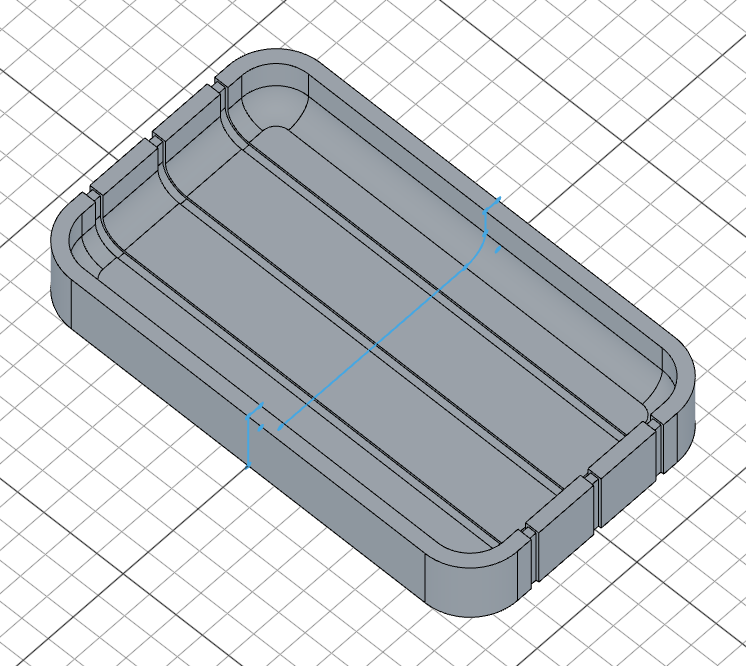
Step 3: Front grooves
The grooves are created by projecting the box's cross-section onto a reference plane, then cutting thin symmetric slots and repeating them.
Groove profiles
We create both groove profiles before cutting anything. This ensures each profile captures the smooth shell shape, unaffected by the other set of grooves.
const facesX = select(face().intersectsWith("front").notOnPlane("xy"))

const s1 = sketch("front", () => {
    intersect(facesX);
});

const facesY = select(face().intersectsWith("left").notOnPlane("xy"))

const s2 = sketch("left", () => {
    intersect(facesY);
});
face().intersectsWith("front") finds all faces that cross the front reference plane — this captures the box's cross-section at the front. .notOnPlane("xy") excludes any faces lying flat on the XY plane (the bottom), since we only want the wall and rim profiles. intersect(facesX) inside a sketch("front", ...) projects those faces onto the front plane, creating a 2D profile that traces the box's outline.
The same technique is applied on the "left" plane for the side grooves. We store both sketch references (s1 and s2) for use in the next steps.

Cut and repeat
const grooveX = extrude(3, s1).thin(-1).remove().symmetric();

repeat("linear", "y", {
    count: 3,
    offset: 25,
    centered: true
}, grooveX);
extrude(3, s1) extrudes the front profile sketch 3 units outward from the front plane. .thin(-1) offsets the profile inward by 1 unit, creating a thin-walled extrusion instead of a solid one — this is what makes the groove narrow. .remove() subtracts the extrusion from the box (a cut), and .symmetric() mirrors it to cut on both sides of the front plane.
repeat("linear", "y", ...) duplicates the groove along the Y axis. count: 3 creates 3 total grooves, offset: 25 spaces them 25 units apart, and centered: true distributes them symmetrically about the center.
Step 4: Side grooves
The side grooves use the same thin extrude and repeat technique, applied to the side profile we already created.
const grooveY = extrude(3, s2).thin(-1).remove().symmetric();

repeat("linear", "x", {
    count: 7,
    offset: 20,
    centered: true
}, grooveY);
Same pattern as before: extrude(3, s2) uses the side profile, .thin(-1).remove().symmetric() creates the thin symmetric cut. This time the repeat runs along the X axis with count: 7 and offset: 20 — more grooves with tighter spacing to fill the longer side of the box.
Full code
// @screenshot waitForInput
import { sketch, extrude, select, fillet, rect, shell, intersect, repeat } from 'fluidcad/core';
import { face } from 'fluidcad/filters';

sketch("xy", () => {
    rect(170, 100).radius(18).centered();
});

const e = extrude(23.6);

const s = shell(-5, e.endFaces())

fillet(8, s.internalEdges())

const facesX = select(face().intersectsWith("front").notOnPlane("xy"))

const s1 = sketch("front", () => {
    intersect(facesX);
});

const facesY = select(face().intersectsWith("left").notOnPlane("xy"))

const s2 = sketch("left", () => {
    intersect(facesY);
});

const grooveX = extrude(3, s1).thin(-1).remove().symmetric();

repeat("linear", "y", {
    count: 3,
    offset: 25,
    centered: true
}, grooveX);

const grooveY = extrude(3, s2).thin(-1).remove().symmetric();

repeat("linear", "x", {
    count: 7,
    offset: 20,
    centered: true
}, grooveY);
What you practiced
rect().radius().centered()— drawing a rounded rectangle centered on the originshell()— hollowing a solid by removing a facefillet()withinternalEdges()— smoothing all edges inside a shellface().intersectsWith().notOnPlane()— selecting faces that cross a reference plane while excluding flat facesintersect()— creating a sketch profile from face/plane intersectionsextrude().thin().remove().symmetric()— cutting thin symmetric groovesrepeat("linear")— duplicating geometry along an axis with centered spacing