Building a Flange With Notch
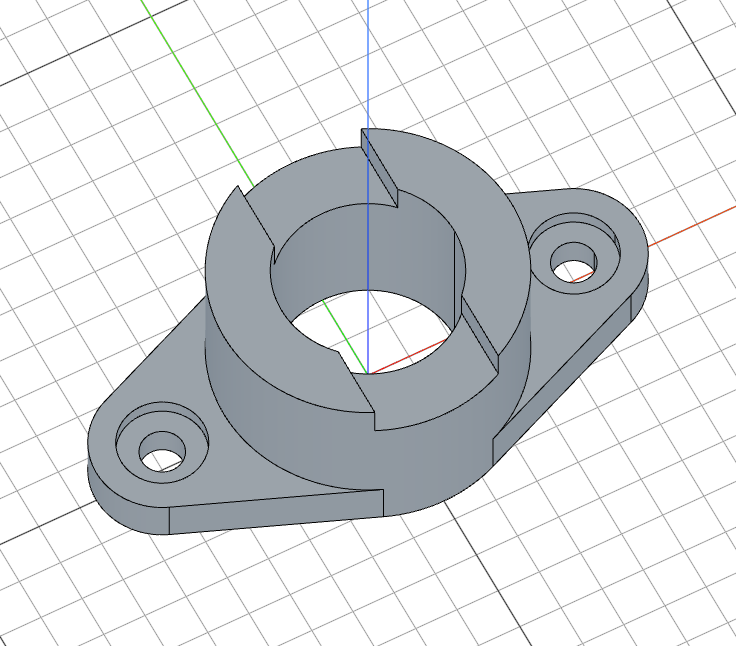
In this tutorial, you'll build a flange with a notch from scratch, based on the original design by Too Tall Toby. It covers tangent lines and arcs, guide geometry, mirror symmetry, reusable sketch geometry, offset reference planes, and counter bores.
Create a new file called flange-with-notch.fluid.js in your project.
Setup
Start with imports. This model uses tangent geometry and constraints.
import { circle, cut, extrude, hMove, mirror, plane, rect, remove,
    sketch, split, tArc, tLine, trim } from "fluidcad/core";
import { outside } from "fluidcad/constraints";
fluidcad/core— all the modeling operations (sketch, extrude, cut, tangent geometry, etc.)fluidcad/constraints— theoutsideconstraint for tangent lines
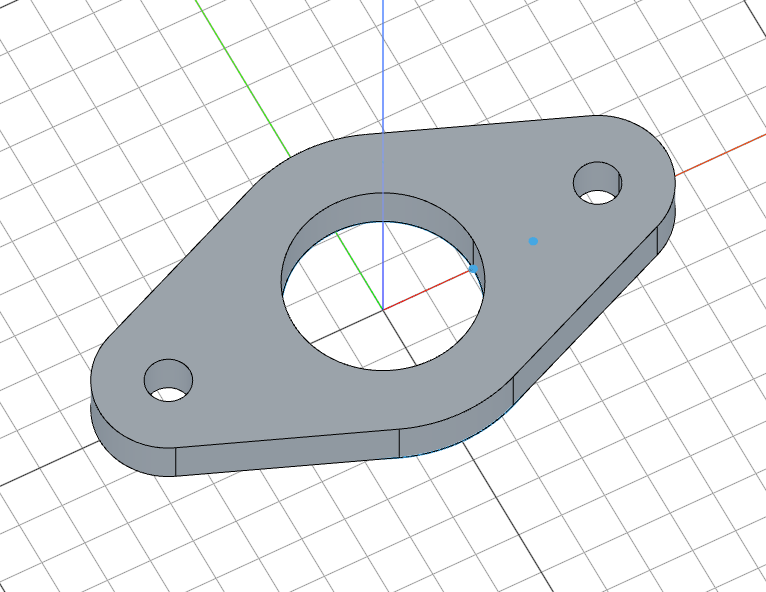
Step 1: Base profile circles
The flange profile starts with two concentric circles and a smaller bolt hole circle placed to the side.
Main circles
const baseSketch = sketch("xy", () => {
    circle(42).reusable();
    const c2 = circle(70).reusable();
    hMove(50)
circle(42) draws the inner bore circle. circle(70) draws the outer flange circle — we store it as c2 because we'll reference it for tangent geometry later.
Both circles are marked .reusable(). Normally an extrude() consumes every shape in the sketch, but a reusable shape sticks around so a later feature can pick it up again. We'll use that in Step 4 to build the middle pipe without redrawing anything. We also keep a reference to the whole sketch as baseSketch so we can clean it up afterwards.
hMove(50) moves the cursor 50 units to the right, positioning us at the bolt hole center.

Bolt hole and guide circle
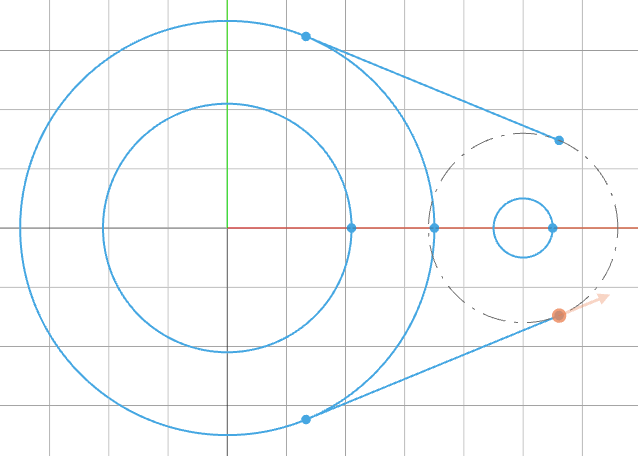
    const c3 = circle(10)
    const c4 = circle(32).guide()
circle(10) draws the bolt hole. circle(32).guide() places a larger construction circle — it's visible for reference but won't become part of the solid. This guide circle defines the tangent boundary for the connecting geometry between the flange and the bolt tabs.

Step 2: Tangent lines and arc
Now we connect the outer flange circle to the guide circle with tangent lines and a closing arc.
Tangent lines
    const l1 = tLine(outside(c2), outside(c4))
    const m = mirror("x", l1)
tLine(outside(c2), outside(c4)) draws a line tangent to both the outer flange circle and the guide circle, on the outside of each. The outside constraint ensures the line runs along the outer edges. mirror("x", l1) creates a matching tangent line on the other side, forming a symmetric pair.
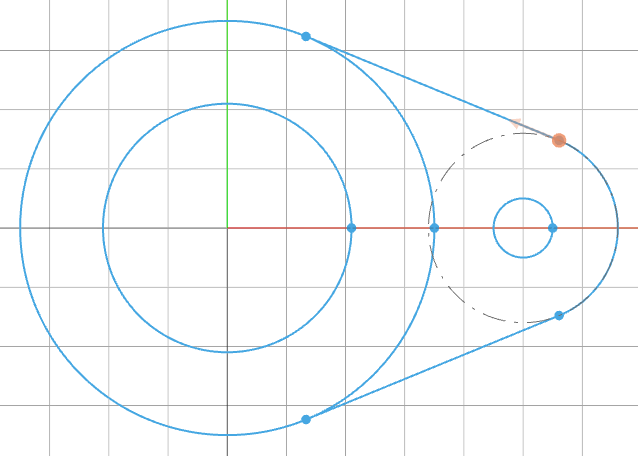
Closing arc
const a = tArc(l1.end())
tArc(l1.end()) draws an arc that smoothly connects the endpoints of the two tangent lines. The arc is tangent to the line at its end, creating a smooth transition around the bolt tab.
Step 3: Complete profile and extrude
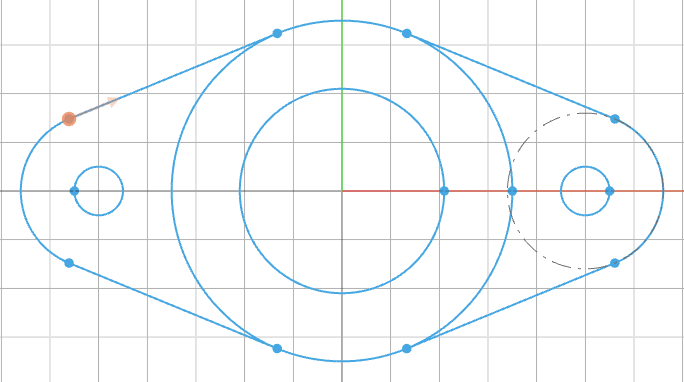
Mirror the profile
    mirror("y", l1, m, a, c3)
})
mirror("y", l1, m, a, c3) mirrors the tangent lines, the arc, and the bolt hole circle across the Y axis. This creates the second bolt tab on the opposite side, completing the symmetric flange profile.
Extrude the base
const base = extrude(12)
extrude(12) pushes the profile 12 units to create the solid flange base. We store the result as base to reference its faces later for the counter bores.
The non-reusable geometry (tangent lines, arc, bolt holes) is consumed by this extrude. The two .reusable() circles stay behind on the sketch, ready for the next step.
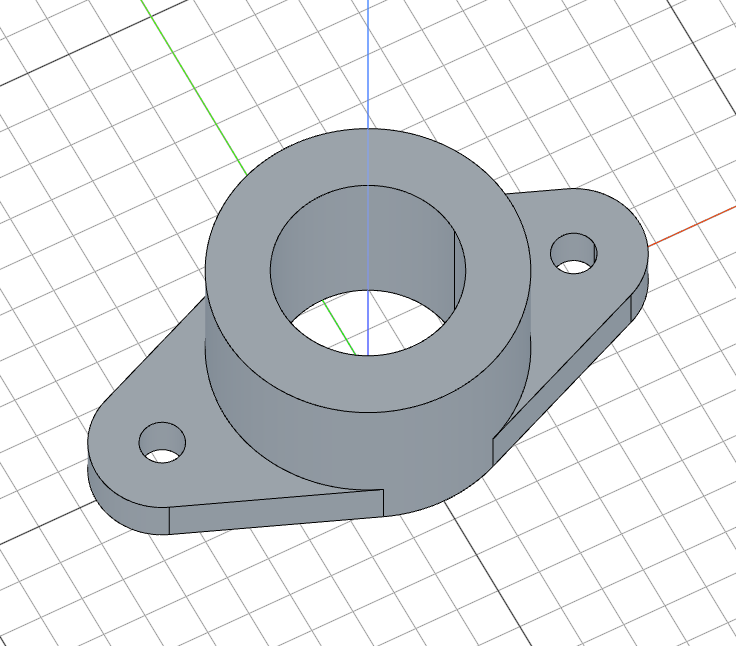
Step 4: Middle pipe
extrude(46);
remove(baseSketch);
extrude(46) picks up the two reusable circles left on the base sketch — the inner 42 and the outer 70 — and extrudes the ring between them to 46 units. That gives us the middle pipe at its full height, sharing the same bore as the flange, with no need to redraw the profile.
Once the pipe is built, remove(baseSketch) disposes of the sketch so its leftover reusable geometry doesn't accidentally get picked up by later operations. It also cleans up the view, making it easier to select the top face of the pipe for the notch.
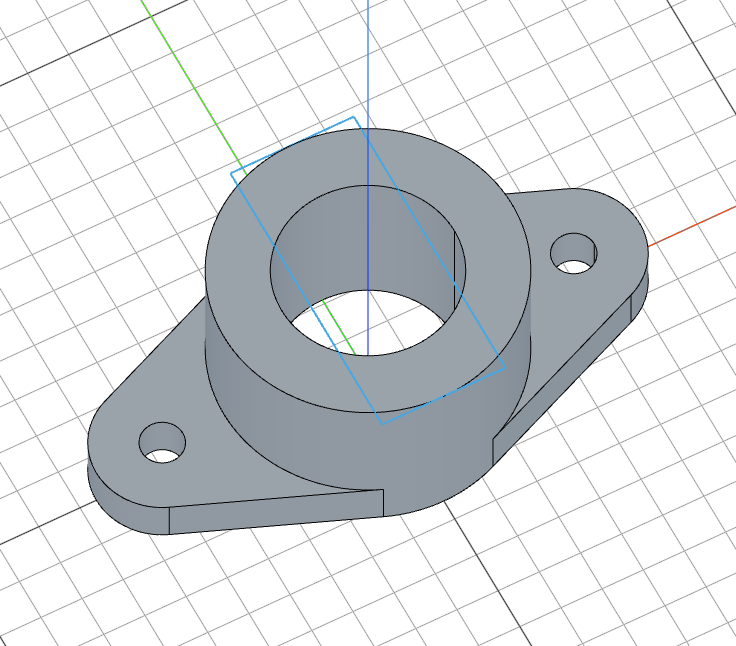
Step 5: Notch
Sketch the notch rectangle
sketch(plane("xy", 46), () => rect(30, 70).centered())
plane("xy", 46) creates a reference plane at the top of the pipe (46 units up). rect(30, 70) draws a 30 x 70 rectangle on that plane. .centered() centers it on the origin so it straddles the pipe wall.
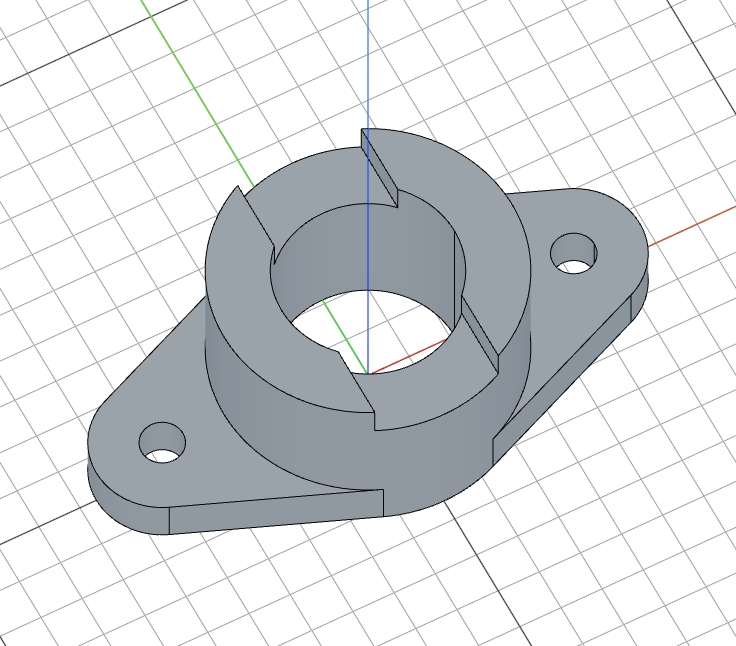
Cut the notch
cut(8)
cut(8) removes 8 units of material downward from the rectangle, creating a notch in the top of the pipe.
Step 6: Counter bores
Sketch the counter bore circles
sketch(base.endFaces(), () => {
    hMove(50)
    circle(20)
    mirror("y")
});
base.endFaces() gives us the top face of the flange base. hMove(50) moves to the bolt hole center. circle(20) draws a larger circle for the counter bore. mirror("y") mirrors it to the other bolt tab.

Cut the counter bores
cut(4)
cut(4) removes 4 units of material, creating shallow recesses for bolt heads.
Full code
// @screenshot waitForInput
import { circle, cut, extrude, hMove, mirror, plane, rect, remove, sketch, split, tArc, tLine, trim } from "fluidcad/core";
import { outside } from "fluidcad/constraints";

const baseSketch = sketch("xy", () => {
    circle(42).reusable();
    const c2 = circle(70).reusable();
    hMove(50)
    const c3 = circle(10)
    const c4 = circle(32).guide()
    const l1 = tLine(outside(c2), outside(c4))
    const m = mirror("x", l1)
    const a = tArc(l1.end())
    mirror("y", l1, m, a, c3)
})

const base = extrude(12)

// middle pipe — reuses the 42 and 70 circles still alive in the base sketch
extrude(46);
remove(baseSketch);

// notch
sketch(plane("xy", 46), () => rect(30, 70).centered())
cut(8)

// counter bores
sketch(base.endFaces(), () => {
    hMove(50)
    circle(20)
    mirror("y")
});

cut(4)
What you practiced
circle().guide()— placing construction geometry that guides tangent lines but isn't part of the solidtLine()withoutside— drawing tangent lines between circles with geometric constraintstArc()— connecting tangent lines with a smooth closing arcmirror()in sketches — mirroring sketch geometry to create symmetric profiles.reusable()— keeping sketch geometry alive across multiple featuresremove()— disposing of a reusable sketch once you're done with itplane()— creating offset reference planes for sketchingrect().centered()— centering a rectangle on the sketch origin.endFaces()— referencing the top face of an extrusion for follow-up sketches