Reference Image
Place a drawing, photo or scan on the sketch plane to trace over it. The picture sits behind your sketch geometry; it does not create curves, participate in constraints or become part of an extruded profile.
In the viewport
- Start or reopen a sketch.
- Click Image on the sketch toolbar (its tooltip is Reference Image).
- In the Reference image dialog, click Choose image… and select a PNG, JPEG, WebP, GIF or BMP file. The picture appears immediately with a frame and handles, initially half the viewport wide.

- Position and size the picture using the handles described below. Use Calibrate… when the drawing contains a known dimension.
- Adjust Opacity so your sketch lines remain easy to see, then click Apply. FluidCAD copies the chosen file into an
images/folder beside the model and writes animage()statement first in the sketch body.
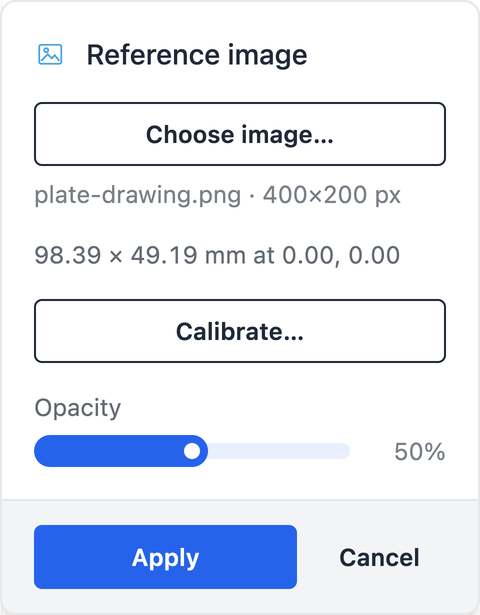
- 1Choose image…Load a picture or replace the current one.
- 2Size and positionRead-only values update as you drag the picture and its handles.
- 3Calibrate…Set the scale from two points and a known distance.
- 4OpacityFade the picture underneath your sketch lines.
The code behind it
The image path is relative to the model file. To try this example, save the sample plate drawing as images/plate-drawing.png beside it, or choose your own image through the dialog. The example sets the full picture width to 100 document units; the dialog screenshot shows the initial placement before sizing it.
// This example uses the sample plate drawing linked from the guide.
// Save it as images/plate-drawing.png beside this file before opening it.
import { image, sketch } from 'fluidcad/core';

const pictureWidth = 100; // Full picture width, including its margins, in document units.

// Choosing the XY plane opens a sketch viewed from above.
sketch('xy', () => {
    // Apply saves the picture's placement inside this sketch.
    // Only width is supplied, so height follows the image's pixel aspect ratio.
    image('images/plate-drawing.png', {
        width: pictureWidth,
        at: [0, 0],   // Centre of the picture in sketch coordinates.
        angle: 0,     // Counter-clockwise rotation in degrees.
        opacity: 0.5, // 50% opacity keeps the picture behind the lines you draw.
    });
});
Move, resize and rotate
| Action | Gesture |
|---|---|
| Move | Drag the picture. |
| Resize with the original proportions | Drag a corner handle. The opposite corner stays in place. |
| Stretch width and height independently | Hold Shift while dragging a corner. |
| Rotate | Drag the knob above the picture's top edge. |
| Rotate in steps | Hold Shift while rotating to snap to 15° increments. |
The dialog reports the width, height and centre in the document unit, plus the angle when rotated. These are readouts, not input fields. In code, at is the picture's centre in sketch coordinates, and angle is a counter-clockwise rotation in degrees.
Calibrate to a known dimension
- Click Calibrate….
- Click the first point on the picture, then the second point. Use two clearly identifiable points whose real separation you know, such as the endpoints of a dimension line.
- In the floating Distance field, enter the real distance in document units and press Enter. For example, if the drawing labels the span as 80 mm and the document uses millimetres, enter
80. - The picture scales about its centre so those points are that far apart. Reposition it if needed, then click Apply to save.
Use Cancel calibration or Esc to leave calibration without completing it. Calibration changes the picture's scale; it does not add a sketch dimension or resize geometry you have already drawn. Calibrate before tracing, then dimension and constrain the traced geometry.
Trace and edit later
After Apply, draw over the picture with the usual sketch tools. The picture remains visible wherever the sketch is shown and hides with the sketch's lines when a 3D feature consumes it.
- Edit: double-click the picture's Image row under the sketch in the timeline. The sketch reopens with the picture's handles. Move, resize, rotate, recalibrate or change opacity, then Apply.
- Replace: open that same row and use Choose image… to select another file.
- Add another picture: click Image on the sketch toolbar again. Each picture has its own timeline row.
- Remove: right-click the picture's timeline row and choose Remove.
Esc cancels a calibration or drag in progress first; otherwise it leaves the tool. Keep the images/ folder with the model when moving or sharing the source files.
For all code options, including explicit width and height, see the image() API reference.