Primitive Geometries
Primitive geometries are the building blocks of sketches — lines, arcs, and curves. They follow a "pen" model: each command starts from where the last one ended, and turtle-like operators (hLine, vLine, tLine, tArc) advance the pen along its current heading.
The viewport gives you live feedback on where the pen is and which way it's facing:
- Orange dot — the current pen position.
- Orange arrow — the current tangent direction.
- Blue dots — endpoints of existing geometry.
circle
circle() takes a diameter (not radius):
import { sketch } from 'fluidcad/core';
import { circle } from 'fluidcad/core';

sketch("xy", () => {
    circle(50)
    circle([30, 20], 40)
})

line
line() draws a straight segment. With one argument it draws from the current
position to the given point; with two arguments it draws between two explicit
points. After the call, the pen ends at the segment's end point.
import { sketch, line } from 'fluidcad/core';

sketch("xy", () => {
    line([0, 0], [100, 0])     // explicit start and end
    line([120, 60])            // continues from [100, 0] to [120, 60]
    line([20, 80])             // and on to [20, 80]
    line([0, 0])               // back to the start, closing the loop
})

The first call sets the explicit start, and every following call continues
from where the previous one ended. The last line([0, 0]) returns to the
origin to close the loop.
hLine
hLine(distance) draws a horizontal segment from the current position.
Positive distances go right, negative go left.
import { sketch, hLine, vLine } from 'fluidcad/core';

sketch("xy", () => {
    hLine(100)     // 100 units to the right
    vLine(60)      // 60 units up
    hLine(-100)    // 100 units left (negative)
    vLine(-60)     // 60 units down (negative) — closes the rectangle
})

You can also start from an explicit point:
hLine([10, 20], 50) // jump to [10, 20], then 50 units right
Centered
Chain .centered() to center the segment on the current position instead of
starting from it. The pen still ends at the segment's far end, so the line
spans ±distance/2 around the start:
import { hLine, vLine, move, sketch } from 'fluidcad/core';

sketch("xy", () => {
    hLine(100).centered()
    move([0, 0])
    vLine(60).centered()
})

This makes symmetric features easy to build without doing the half-distance math by hand.
Up to a target
Pass a sketch object instead of a distance to extend the line until it meets that target. The nearest intersection along the line's direction (in either sign) is used:
import { line, hLine, vLine, move, sketch } from 'fluidcad/core';

sketch("xy", () => {
    const wall = line([80, -20], [80, 100]).guide()
    const ceiling = line([0, 60], [120, 60]).guide()

    move([0, 0])
    hLine(wall)          // origin → meets the wall at x=80
    vLine(ceiling)       // up to the ceiling at y=60
})

The call throws if the ray never meets the target. .centered() cannot be
combined with the target form.
vLine
vLine(distance) is the vertical counterpart of hLine. Positive distances
go up, negative go down. It supports the same .centered() and target-geometry
forms (the screenshots above use vLine too):
vLine(40)             // 40 units up
vLine(-20)            // 20 units down
vLine(60).centered()  // centered on the current position
vLine(targetGuide)    // up or down to the nearest intersection
aLine
aLine(angle, distance) draws a line at the given angle (in degrees), measured
from the current tangent — not the X axis. After a previous segment the
pen's heading rotates with it, so the angle is always relative:
sketch("xy", () => {
    line([0, 0], [50, 0])
    aLine(60, 40)              // 60° from the +X tangent, 40 units long
})
.centered() works the same way as on hLine / vLine.
Up to a target
Pass a target geometry as the second argument to extend the angled ray until it meets the target:
import { sketch, hLine, aLine, back } from 'fluidcad/core';

sketch("front", () => {
    const l1 = hLine([0, 50], 200).centered().guide()
    back(2) // back to origin
    aLine(45, l1)
});

Here a centered horizontal guide is placed at y = 50, the cursor is rewound
to the origin with back(2), and the 45° line extends from the origin until
it meets the guide.
tLine
tLine(distance) is like hLine / vLine, but the heading is the current
tangent — the direction the pen is pointing, shown by the orange arrow in
the viewport. It's the natural way to continue a profile after a curve
without introducing a sharp corner.
import { sketch, arc, tLine } from 'fluidcad/core';

sketch("xy", () => {
    arc([60, 60]).center([0, 60])   // quarter arc — pen ends at (60, 60), heading +Y
    tLine(80)                        // continues 80 units in that tangent direction
})

A negative distance reverses the heading (the line goes backwards along the tangent), which is occasionally useful for back-tracking.
tLine() also has constrained overloads — tangent to one or two objects, with
qualifiers like outside() and enclosing(). Those are covered in
Constrained Geometry.
arc
arc() is the most flexible primitive. It has three families of overloads:
by radius and angle, between two points, and between two points with
a center or bulge. The default sweep direction is counter-clockwise.
By radius and angle
arc(radius, startAngle, endAngle) draws an arc centered at the current
position. Angles are in degrees, measured from the current tangent
direction (or +X when there is no previous geometry). startAngle defaults
to 0 and endAngle defaults to 180, so arc(60) draws an upper
half-circle:
import { sketch, arc } from 'fluidcad/core';

sketch("xy", () => {
    arc(60)     // defaults: 0° → 180°, centered at the current position
})

This overload does not change the pen position — the pen stays at the center. Pick any angle range to control where the arc starts and ends:
import { sketch, arc } from 'fluidcad/core';

sketch("xy", () => {
    arc(60, 0, 90)     // quarter arc, from 0° (tangent +X) to 90° (tangent +Y)
})

Because angles are read off the current tangent, chaining arc() calls
rotates the angle frame with the pen. If you want the next arc back in the
+X frame, start it from a fresh sketch("xy", …) block.
Centered
Chain .centered() to interpret startAngle as the midpoint of the sweep
instead of its start. The sweep then straddles that angle by ±endAngle/2:
import { sketch, arc } from 'fluidcad/core';

sketch("xy", () => {
    arc(60, 0, 90).centered()   // 90° sweep, centered on the +X tangent: −45° → 45°
})

Reversed angles
If startAngle > endAngle, the arc still sweeps counter-clockwise — it just
takes the long way around. So arc(60, 90, 0) draws a 270° arc from the 90°
mark back to the 0° mark (the gap sits in the upper-right quadrant):
import { sketch, arc } from 'fluidcad/core';

sketch("xy", () => {
    arc(60, 90, 0)     // 270° arc: sweeps CCW the long way from 90° back to 0°
})

Between two points, with a center
arc(endPoint).center(centerPoint) draws an arc from the current position to
endPoint, with centerPoint as the center of the circle. The two-argument
form arc(startPoint, endPoint).center(centerPoint) is the same but with
an explicit start. Both advance the pen to endPoint.
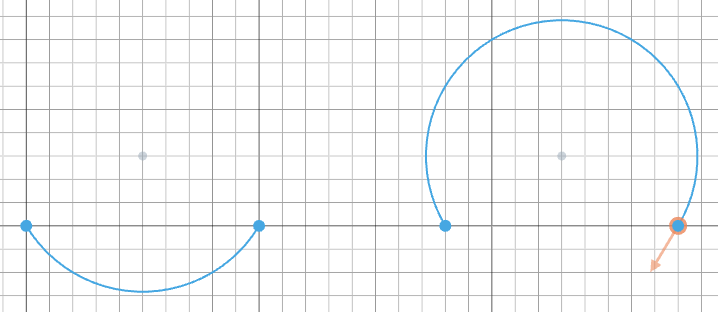
The default sweep is counter-clockwise. Chain .cw() to reverse it —
swapping which of the two possible arcs you get for the same chord and
center:
import { sketch, arc } from 'fluidcad/core';

sketch("xy", () => {
    // CCW (default): with the center above the chord, the short arc dips below
    arc([0, 0], [100, 0]).center([50, 30])

    // Same setup, but .cw() reverses the sweep so the short arc bulges above
    arc([180, 0], [280, 0]).center([230, 30]).cw()
})
Between two points, with a radius
.radius(r) builds the arc from the chord and a bulge radius. The sign
of the radius selects the direction:
- positive radius — sweeps CCW; the arc bulges to the right of the start → end chord direction (below the chord when the chord runs left-to-right along +X).
- negative radius — sweeps CW; the arc bulges to the opposite side.
This is the most ergonomic way to draw small fillet-like arcs along a profile.
import { sketch, arc } from 'fluidcad/core';

sketch("xy", () => {
    // Positive radius → CCW: arc bulges below the chord
    arc([0, 0], [100, 0]).radius(80)

    // Negative radius → CW: arc bulges above the chord
    arc([150, 0], [250, 0]).radius(-80)
})

If |radius| is smaller than half the chord length there's no valid circle,
so FluidCAD clamps it to chord/2 and draws a semicircle connecting the two
points. In the sketcher this also surfaces an inline warning.
Major vs minor arcs
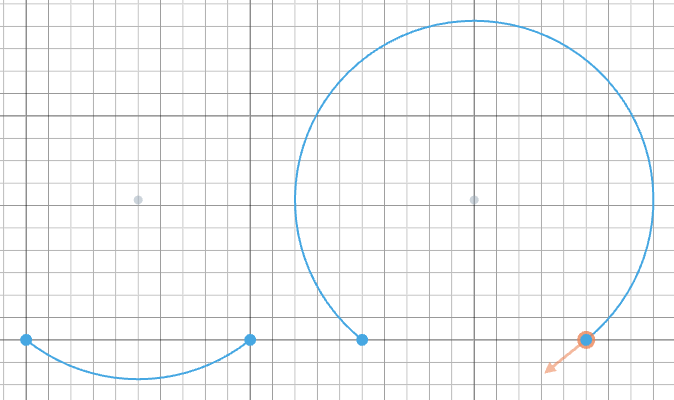
By default .radius() returns the minor arc — the shorter of the two
arcs that fit the chord and radius. Chain .major() to get the long way
around instead:
import { sketch, arc } from 'fluidcad/core';

sketch("xy", () => {
    // Minor arc (default): the shorter of the two arcs that fit
    arc([0, 0], [100, 0]).radius(80)

    // Major arc: same chord and radius, but the long way around
    arc([150, 0], [250, 0]).radius(80).major()
})
tArc
tArc() draws an arc that's tangent to the previous geometry. The arc leaves
the pen in the direction the orange arrow is pointing, which keeps profiles
G1-continuous (no kinks). It has several overloads — only the basic ones live
here; the constrained forms (tangent to one or two objects, between
points-and-objects) are covered in
Constrained Geometry.
Tangent continuation by radius and angle
tArc(radius, endAngle) is the most common form. radius defaults to 100
and endAngle to 90. A negative radius flips the sweep direction; a
negative angle sweeps clockwise.
import { sketch } from 'fluidcad/core';
import { vLine, tArc } from 'fluidcad/core';

sketch("front", () => {
    vLine(100)
    tArc(50, 180)
    tArc(80, -270)
})

To a given point
tArc(endPoint) draws an arc from the current position to endPoint, with
the start tangent inherited from the previous element. The radius is
whatever's needed to fit that arc.
import { sketch, hLine, tArc } from 'fluidcad/core';

sketch("xy", () => {
    hLine(80)             // pen ends at [80, 0], tangent +X
    tArc([160, 80])       // arc that leaves tangent to +X and lands on [160, 80]
})
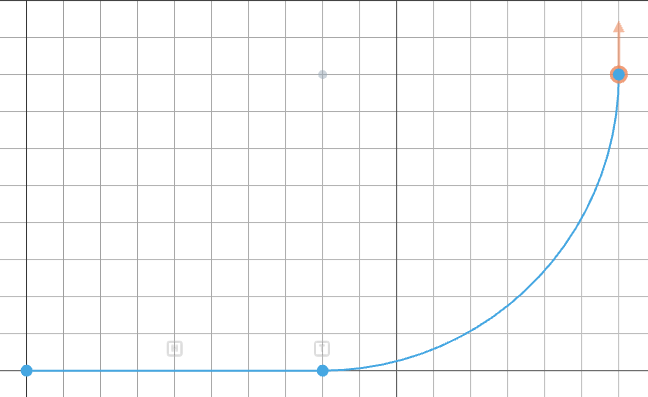
This is handy when you know where the arc needs to end but don't want to work out the matching radius by hand.
With an explicit start tangent
When there's no previous element — or when you want to override its tangent —
pass an explicit direction as the last argument. tArc(radius, angle, tangent)
uses that vector instead of reading the heading from the sketch.
import { sketch, tArc, move } from 'fluidcad/core';

sketch("xy", () => {
    tArc(60, 180)                  // default tangent (+X): chord is vertical, arc bulges right
    move([200, 0])
    tArc(60, 180, [0, 1])          // explicit +Y tangent: chord is horizontal, arc bulges up
})
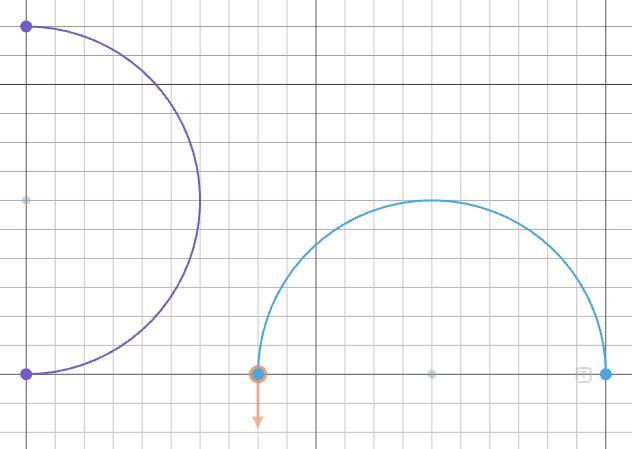
The same trick works on the point overloads: tArc(endPoint, tangent) and
tArc(startPoint, endPoint, tangent) pin the arc's tangent direction
explicitly.
bezier
Draws bezier curves through control points:
sketch("xy", () => {
    bezier([0, 0], [50, 100], [100, 0])   // quadratic bezier (1 control point)
})
The last point is the endpoint. Points in between are control points:
- 2 points = straight line
- 3 points = quadratic bezier (1 control point)
- 4 points = cubic bezier (2 control points)
Call bezier() with no arguments to enter interactive mode. Click in the viewport to place control points with a live preview of the curve. Use Ctrl+click to drag existing points, and Escape to undo.