Your First Model
In this tutorial you'll build a small open-top container with rounded corners. Along the way you'll learn the core workflow: sketch → extrude → modify.
Create a new file called box.fluid.js in your project folder.
Step 1: Import what you need
import { sketch, extrude, shell, fillet } from 'fluidcad/core';
import { rect } from 'fluidcad/core';
Everything you need comes from fluidcad/core. Later guides will introduce fluidcad/filters for advanced selections.
Step 2: Sketch a rectangle
sketch("xy", () => {
    rect(100, 60)
})
sketch("xy", ...) opens a 2D drawing on the XY plane (the ground plane, looking down from above). Inside the callback, rect(100, 60) draws a rectangle that is 100 wide and 60 tall.
You should see a flat rectangle in your viewport.
Step 3: Extrude it into a box
import { sketch, extrude } from 'fluidcad/core';
import { rect } from 'fluidcad/core';

sketch("xy", () => {
    rect(100, 60)
})

const box = extrude(30)
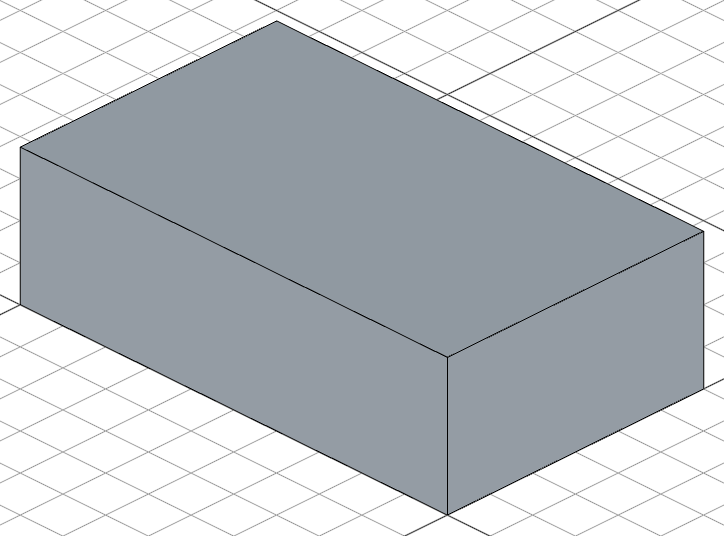
extrude(30) pulls the sketch 30 units upward into a solid box.
Notice that we didn't pass the sketch to extrude() — FluidCAD automatically picks up the last sketch. Most operations work this way: extrude() grabs the last sketch, fillet() targets the last selection, and touching shapes auto-fuse into one solid. You can always be explicit when you need to, but smart defaults keep simple cases simple.
We save the result in box so we can reference its faces and edges later.
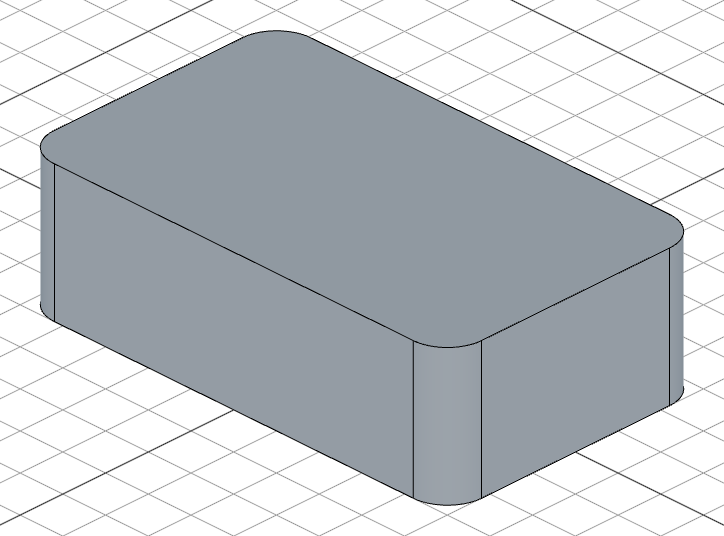
Step 4: Round the corners
Let's make it nicer by rounding the rectangle's corners. Update the sketch:
import { sketch, extrude } from 'fluidcad/core';
import { rect } from 'fluidcad/core';

sketch("xy", () => {
    rect(100, 60).centered().radius(8)
})

const box = extrude(30)
.centered()moves the rectangle so its center sits at the origin..radius(8)rounds all four corners with a radius of 8.
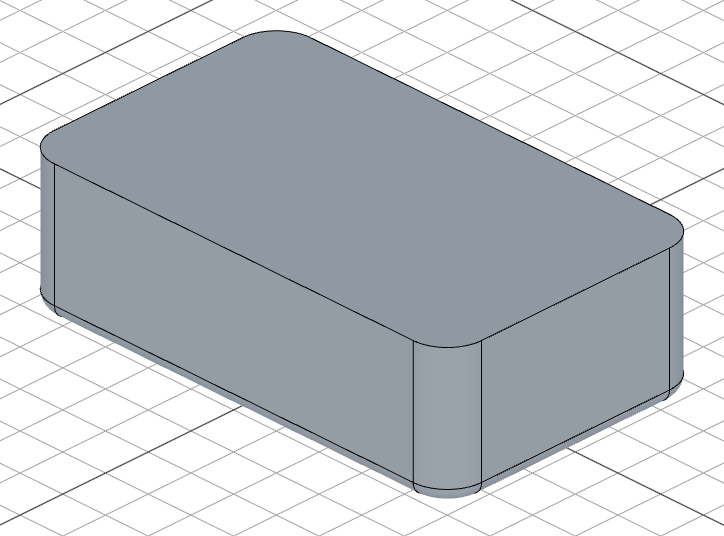
Step 5: Fillet the bottom edges
Let's round the bottom edges of the box:
fillet(3, box.startEdges())
box.startEdges() selects the edges at the bottom (start) of the extrusion. fillet(3) rounds them with a radius of 3.
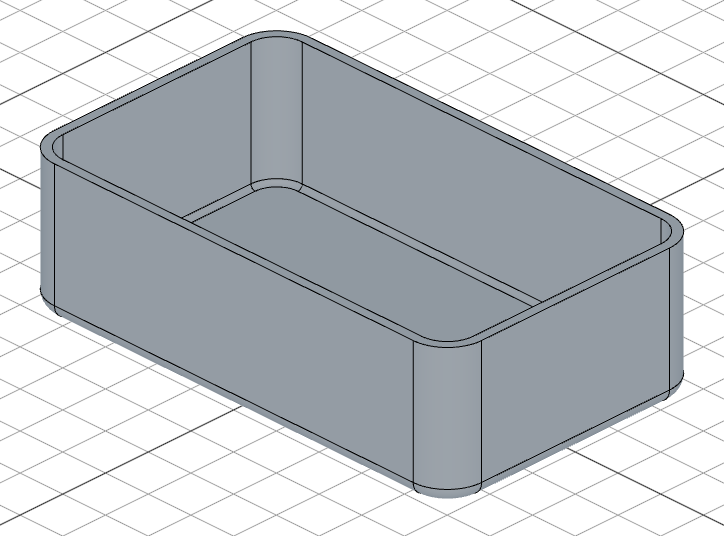
Step 6: Shell it into a container
Finally, let's hollow out the box to turn it into an open-top container:
shell(-2, box.endFaces())
shell(-2, box.endFaces())removes the top face and hollows out the solid, leaving walls that are 2 units thick.- The negative thickness means the shell goes inward — the outer shape stays the same.
box.endFaces()tellsshell()which face to remove — this becomes the opening.
Full code
Here's the complete model:
import { sketch, extrude, fillet, shell } from 'fluidcad/core';
import { rect } from 'fluidcad/core';

sketch("xy", () => {
    rect(100, 60).centered().radius(8)
})

const box = extrude(30)

fillet(3, box.startEdges())

shell(-2, box.endFaces())
What you learned
sketch(plane, callback)draws 2D shapes on a planeextrude(distance)turns a sketch into a 3D solidfillet(radius, edges)rounds edgesshell(thickness, faces)hollows out a solid into a thin-walled container- Operations like
extrudereturn objects with methods like.endFaces()and.startEdges()that let you reference specific geometry - Most operations have smart defaults —
extrude()picks up the last sketch, and touching shapes auto-fuse into one solid
You're ready to explore the Guides for deeper coverage of each feature.